,

Share one USB printer with more than one PC

Share one USB printer with more than one PC

Share one USB printer with more than one PC
Share a printer easily!
What if you could share a printer with multiple computers instead of getting up to change your USB cable connection every time? Now you can. Share one printer between two or more computers by sharing the USB cable instead of switching it every time you need to print something. There’s a nifty device called a USB Printer Automatic Sharing Switch that makes it possible to connect a single printer to two or more computers without ever having to switch the cable every time.

This device monitors the USB connections from all the connected computers, and when it detects that one of them is sending a print job to the printer it automatically connects that computer to the printer.

Share one USB printer with more than one PC
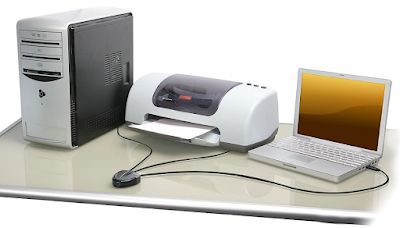
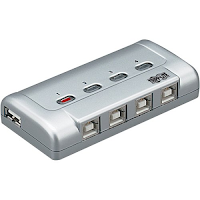
There is a choice of 2-port and 4-port models depending on how many computers you have to connect to the printer.


Share one USB printer with more than one PCInstallation is very simple as these devices are Plug and Play types that do not require additional skills. You need to plug the computers and the printer into the switch box and then install the software on each of the computers. 

And the good news is that you can get a 2-port switch for as less  as $20! Just one thing to remember is that some models have switches that need to be manually turned on or off in order to make the connection to the specific computer you want to print from. 

However there are automatic models that you can choose and they come with an automatic switch. The difference in price is very less, but the ease of use and time saved is huge.

Click here to look at some the great selection of USB Printer Auto Sharing Switches at Amazon.com


Note: The links in this post are affiliate links.
, ,

How to block any website on Windows PC

How to block any website on Windows PC

The other day I received a mail from my reader Venugopal, asking me to help out with a peculiar problem - how to block a website on Windows PC so that no one could access it without his permission? You see he had saved all his passwords in his browser and someone in his family had used his PayPal credentials to pay up for a product in an online purchase. Seeing that it was done for a children's product he guessed that it was done by his teen kid who wanted to buy something which would have 'officially' not been approved. So he wants to know if the PayPal site can be blocked in that PC thereby avoiding a conflict.

Here is my reply to him:  Yes, Venu, fortunately there is a way to do it and it is very simple. And it has to do with adding a single line to a Windows file named Hosts.

Here’s how to do it:


  1. Log in to Windows using your Administrator account that has Administrator privileges. Usually the one you boot into Windows is an Administrator account by default. I'll tell you why this is important in point number 7 below.
  2. Open Windows Explorer and go to C:\Windows\System32\drivers\etc. then double-click the Hosts file. Select Notepad as the program to open it with.  
  3. Make a backup of the Hosts file before doing anything else (just in case anything goes wrong) by copying the contents of that file in a new notepad file and saving it in your regular place like 'My Documents' or 'Desktop'.
  4. Now in that Hosts file in notepad, go to the end of the very last line in the file, then press the Enter key to create a new line.
  5. Type 127.0.0.1 then press the space bar. Now type the URL of the website you wish to block (in this case www.PayPal.com). 
  6. Here, you could repeat steps 4 and 5 in order to block other websites in addition to www.PayPal.com. 
  7. Click File > Save as, then click the Save button to save the modified hosts file. Here if you are not an Administrator, you will not be able to save it as it is a system file.
  8. Restart your PC, then check to see if your can get to the www.PayPal.com website. If all steps were done correctly, you won’t be able to access it with any web browser.
Here’s a screenshot:


Note: This tip will work for Windows XP, Vista and Windows 8 as well. 

I suggest you might to consider placing a password on your Administrator account as otherwise anyone can simply undo the block from the Hosts file with a simple Google search. If you password protect your PC, no one will be able to alter the Hosts file to remove the line(s) you added.


, , ,

Put your music collection online and stream it from anywhere - for free!


Put your music collection online and stream it from anywhere - for free! Yes you heard me right. Now you can use some free services to store your music online and access them anywhere from any device.

Music streaming is the hot new craze, what with many services already offering access to millions of songs for a monthly fee - but I am talking about your own collection.

If you have your own music collection on your PC that you have built painstakingly over the years, you can now put it online and stream it from anywhere for free.

Just imagine - you are driving in your car and forgot to upload your favorite songs in your pen drive or CD and now you have to travel with some boring music from the FM stations.

But having your collection online will allow you to download the tracks that you want and voila! you are now able to hear your favorite Bollywood blockbusters!

The best option is - Google Play Music:

Google Play Music  is a free service that allows you to upload up to 50,000 songs and stream them from anywhere much like what you do with google drive or Dropbox. Google offers the biggest storage option by far.

Just download the Google Music Manager application ( for Windows or Mac), install it, and sign in with your Google account.

Just sync your music folders and it will automatically copy/build that music collection in Google Play Music.

It will monitor your music folder in the computer and automatically upload any new music you add to your PC, to your google account.

You can also upload songs directly from the website using the browser. You can then sign into Google Play Music on the web, via the Android app, or the iPhone or iPad app and stream music while on the go.

An amazing bonus is that the mobile apps let you download songs for offline listening too; you can just cache them without having to plug back into your computer.

To upload music more quickly, Google Play Music will “match” your local song to a song on Google’s servers (much like what Shazam does to song identification). If Google already has a copy of the song, you’ll get that one without uploading it fully.

If you want an offline copy of your music again, the Music Manager application allows you to re-download your entire collection.

We will look at other options in a future article. 

, ,

Help - Networking = Not working (Try the 8 port router)

Question from Ananth Subramaniam:

Hi CG Kish. I need your help in a matter that is technical. I need a six-port wired router (do they exist?). We have a total of 5 staff who need to access the Internet and our office server via LAN and I don't want to have to install two 4-port routers just for two extra systems.
The only problem is that I can’t seem to find a 6 port router. All I can see are 4 port routers in Amazon as far as my eyes go. Do you have any suggestions as to where we might be able to procure one? We cannot use Wi-Fi, therefore are opting for a wired router.


Editor's answer:

Hi Ananth. I have a suggestion for you. After doing a bit of research, I was able to zero in on a wired router that has 8 Ethernet ports.

It’s the TP-LINK TL-R860, and it comes at about $30 at Amazon as of date.

But wait... there is a small limitation with this one. The limitation of this router is that the data transfer speed is limited to 100Mbps on every port.

That should be more than adequate only if most of your PC work involves internet access.

But as you have already said that your staff need to share files with each other and also use the office intranet server, I think you would be better off using an 8 port Gigabit Switch+Router/Modem combo.

You can connect your 6 computers (5 staff's PC plus your PC) to the Gigabit Ethernet switch, and then provide internet to everyone by connecting the switch to the internet modem through a regular router (since you already own a router I think you need not buy one again).

Using this setup your staff can easily connect to the Internet with no visible loss in speed while also allowing them to access the office server at a decent speed that’s supported by the Gigabit switch.

Bottomline -  Choose the second option of an 8 port switch/router/modem configuration that will well serve your needs and in future if you plan to add a PC or two, it will still help and save you the cost of another router!

I hope this helps Ananth. Best of luck!  And do let me know how you went about solving your problem,


Note: The links in this post are affiliate links.
,

Disable automatic App updates on your Android device


Disable automatic app updates on your Android device. If you have an Android phone or tablet, did you know that your device has default settings to update the apps automatically from the Google play store? But why should we disable it?

Not that there is something wrong with that. Auto-Updates are good if all your apps are trustworthy and known to you. You don't have to worry with every app’s 'permissions' and you are connected to a strong 3G, 4G or Wi-Fi signal available.

But there is one drawback to this and it has to do with changing of permissions by the app's programmer or its team. Sometime the app will ask for broader set of permissions which will have you to take a look had it been in 'manual' mode.

If you need proof, check the read more option below the app's what's new info box, in Google play store.

So, if you prefer to check and review the new permissions before allowing your apps to update or if you are on a low data usage on 3G or 4G, you are advised to set off Auto-Updates.

Here’s how to set off Automatic app updates in Android devices: 

  1. Click on the Play Store icon.
  2. Click the Options icon in the top left-hand corner of the screen.
  3. Click Settings.
  4. Click Auto-update apps.
  5. Select the Do not auto-update apps option.
That’s all there is to disable automatic app updates in Android devices.

After this change you will receive a notification whenever updates are available for your installed apps, so you can open the Play Store and update the apps at your sweet time.
,

How to block Game and App invites on Facebook

How to block Game and App invites on Facebook

Hi Kish
I have a problem. I want to know how to block Game and App invites on Facebook. You see I have a 'friend' in Facebook who keeps sending me invites to games almost every day. I asked him to stop sending these invites as I am not a gaming aficionado. In return he asked me to stop posting in his Facebook feed! I wonder how his thick-skulled brain did not comprehend the simple fact that my posts in his Facebook feed is because he accepted me as a friend in the first place! And he says with utter disrespect that he does this as a retaliation of my feed!
I asked him to simply unfriend me and finally that was what he did.
However I have a nagging doubt. Can I turn off the game invitation option so that no one else can disturb me in that way? Sorry if I sound frustrated... but I am.
Regards
KK.

Hi KK
Yes there is a way to do it. Lots of FB users love playing games on Facebook, but many others would prefer not to disturbed, in case they have no interest in these things.
As madame luck would have it, there are two ways to block all game (and app invitations) permanently! And the sad fact is that not many people are aware of it!

Method 1: Here’s how:

Note: Disabling game and app invites will disable ALL Facebook games and apps, even the ones that you use yourself on a daily basis. See the last paragraph of this post for further details. If you are OK with that let’s get started!

  1. Go to your Facebook account settings icon in the upper right-hand corner.
  2. Click the Apps link over in the left-hand column and go to the Apps, Websites and Plugins section.
  3. Click the Edit link.
  4. Click the Disable Platform button. That's it!

From now onwards you will never receive any game or app invitation. Of course you can revert later and turn Platform back on simply by editing the choice you made in step 4.


Note - If you turn off the Platform apps:


  • You will not be able to log into websites or applications using Facebook.
  • Your friends won't be able to interact and share with you using apps and websites.
  • Instant personalization will also be turned off.
  • Apps you've previously installed may still have info you shared. Please contact these apps for details on removing this data.
  • Apps you've logged into (with Facebook or Anonymously) will be removed.
  • Posts by apps will be removed from your profile.

Method 2 - (Recommended by me):


Go to the GAMES section. On your Facebook news feed page there is a column on the left. Can you see the GAMES section?

Click on it and you’ll see a list of games that are available on Facebook.


Click on the ACTIVITY tab.


On the left you see INVITES and REQUESTS. By default the page loads REQUESTS, if you’re not playing any games then the REQUESTS list would very likely be empty.

What you need to do is click on INVITES (because that’s the irritation that you’re facing from your thick skulled 'friend'.


OK so now we’re at the list, and this is where you can actually block all game requests. When you click on the big X mark on each invite it will ask you two things as seen in the pic.


 You have a few choices now.
a) Block ALL invites related to the particular game in this case Pirate Kings or -
b) Block the said individual from ever sending you games.

Choose option (b) if you have problem with one particular individual as in your case.

Hope it helps!
, ,

Review: DreamHost - 200% faster Web Hosting


Many bloggers fail and enter a state of oblivion, because their hosting lags behind in speed and functionality.

There are hosting related issues, that do not seem to be taken care of adequately by their hosting providers which ultimately brings their ranking down, because Google hates downtime.

Your hosting is the life-line of your blog. So if it’s not strong enough, then it your blog or website may fail terribly.

In this article, we are going to talk about one of the best blog hosts out there that you can use to create a perfect site.

DreamHost - Web Hosting That's 200% Faster!

Slow websites are a pain. People don't have patience while clicking them and you lose all valuable traffic. With solid state drives (SSDs) pages load 200% faster so that your website visitors are a happier lot! 

  • Plans Starts at $8.95/mo & includes 1 free domain name.

The mark of a good host is one:
  1. Who is ahead of competition and cost-effective too. 
  2. Can answer your questions providing solutions for beginners or highly advanced programmers?
  3. Makes it really easy to install blogs, forums, shopping carts, or any add-on features for your sites? 
  4. Provides unlimited Email Accounts 
  5. Has a web-based Control Panel
  6. Has new Solid State Drives (SSDs) instead of the old HDDs
DreamHost does just this. One free domain is included with your account, and you can add as many domains as you want.

Want more? They include unlimited sub-domain hosting without any extra charge.

Are you wondering about space offered?  They offer 500 GB of storage and 5 TB (!!!) of bandwidth in the starter package that will take care of most people's needs, but if you require more than that they can provide it!

Mechanical hard drives are old school. With SSDs (solid-state drives), your sites perform better, and you’ll experience faster database queries and faster caching overall, so much so that you will wonder why everyone is not offering the same.

Starting a Website Was Never So Much Easier and Quick... 

You can use any web software you like on your sites, with ease and comfort - perl, php, cgi, FrontPage extensions, MySQL and more - all up to date with simple interfaces for you to take advantage of. Do you have questions on how to use or work with these technologies?

Read the extensive help wiki or talk to the great customer service reps who will do everything they can to help you.

Click on the pic to see prices and plans at DreamHost.
More importantly DreamHost has a great up-time rate promising 100% uptime on their site, which is a very bold promise for a host to make.

This emphasizes the company’s nearly legendary server data centers and network infrastructure, so your customers will always see your pages.

They have a very very small downtime periods compared to others so that is a big plus.

DreamHost makes it easy to add a wiki, forum, a WordPress eCommerce blog, shopping cart, and photo management to your site. But that's not all.

At DreamHost, you are in control of your account. Get full access to number of features, manage your web mail, set up auto-responders, view detailed site statistics for each domain - and so on - and leave it at that.

Cons: A lack of security features keep DreamHost from being one of the top web hosting services. Site backup and restoration are not available under its shared plans, however, email spam protection and SSH come standard with the small business shared hosting plan.

Bottom-line: This web hosting service is suitable for small and medium websites and experienced web developers. DreamHost really blazes ahead of its competition with its hosting package. If you are dissatisfied, you have over three months to cancel and get a refund. That however may not happen, once you get used to the unique control panel and the phenomenal speeds.


Click here to sign up for DreamHost


, , ,

Yatrachef.com – hot food at your train seat in India


Presenting Yatrachef.com a resource that guarantees delivery of food of your choice right at your seat. 

India is growing up at a good pace now. If you thought that meals served on the train are rich sources of viruses and bacteria and must be avoided at all costs, you are lagging behind. Yes... there is a tempting alternative the next time you feel hungry in a train journey in India. Yatrachef.com – hot food at your train seat in India.

Yatrachef has come into existence, to add spice and comfort to these 3 million travellers every day.
YatraChef helps you have your favorite food in train from the best and most popular restaurants and fast food chains near railway stations across India.

How it works: 

You type in your train details and they will tell you the Restaurants that deliver fresh food at your seat in train throughout your journey. You can choose from the vast menu according to your date and time of travel, so that you can find what you're looking for and also get it delivered in train.

You can place your order online or by phone (0 8137 8137 00) or through WhatsApp (that is very neat), free of charge.

In a world, where people are fast moving to comfortable ways of living in their everyday lives, getting a simple desired meal on train still remains a problem.

I am sure you have experienced something similar to this if you are an Indian:
  • Waking up early to prepare meals for your journey (that too which lasts only for a few hours?
  • Spending a whole day on forced diet.
  • Receiving inferior quality food from Station vendors which is fit for animals (some not even for them).
  • Being worried about leaving your luggage in the train while going out to buy food at a platform.
  • Or worried that the train may leave before you get your order packed at the stations.

If your answer to any of the questions is yes, then yatrachef.com is the solution for you.

Piping hot food for all travelers via easy ordering apps or hotline numbers is their endeavor.
Yatrachef.com has spread its reach across 170 stations and in over 3500 + trains. It seems to have a phenomenal response... and why not? It requires some courage and determination to start something as big as this. The very planning would be a nightmare, forget the implementation. The people involved are to be applauded for this tremendous effort.
I hope they overcome all hiccups and establish themselves as a great avenue for travelers who seek quality food.

Indian rail passengers need this service for sure.
A train delivery is a very important logistical operation as the food needs to be delivered in a fresh and hot condition within a five minute window when the train stops at a station.

This gives customers peace of mind as they can rely on us to get their meals delivered without fail. This is just one of the many improvements/innovations that they want to bring to this space.”


They even serve custom prepared food when you are traveling in groups.

Just enter your PNR status and order through YatraChef.com and enjoy fresh quality food across India while you travel in train.

,

Review: Headphones with sharing function - Amkette Tango FDD737BL


Amkette Tango FDD737BLThe chance that you may have never used an earphone to listen to music is almost zero. Like it or not, we  love listening to good music from not only MP3 Players but Cellphones and music websites with headphones and Earbuds (in-ear phones). If you want to try out a decent headphone that comes with superb quality rendering and also the ability to share with another friend I would suggest checking out the Amkette Tango FDD737BL Trubeats Tango Wired Headphone.


In fact, we see many people listening to music whilst doing almost anything. Wonder if Doctors did that while in the OT?!

If you want to try out a decent headphone that comes with superb quality rendering and also the ability to share with another friend I would suggest checking out the Amkette Tango FDD737BL Trubeats Tango Wired Headphone.


Amkette Tango FDD737BL
These headphones were designed with sharing in mind. 


The headband adjusts to comfortably fit little kids' heads and up, and the bright colored decals that they come in (totally 4 variants) will appeal to most everyone. And best of all, the sound quality is quite good featuring the bass-rich Trusound that will provide you with well balanced treble, high and low mid sounds. Its USP is the thumping bass that will make you feel like watching a live concert (popcorn not provided!).

Amkette Tango FDD737BL

Another thing I liked was the portability. You can fold it neatly and save some space in your bag.


Pros:

Mic: Integrated mic that supports internet calling via skype or hangouts in laptop /desktop No Muffled sound.Sharing: There is a aux out 3.5mm jack that you can connect to any headphone or headset or speaker system and listen with your friends/family. Portable/fold-able - Easy to slug it around.
Gold plated 3.5 mm angled input jack that allows to you connect with almost any media device.
  Cons:   While the quality may not be top notch as the high-end ones due to pricing constraints it does quite well with what best resources the company has put in for that price range. Seems like the only shortcoming in my view.   This product comes with 1 year Limited Hardware Warranty   Check out the Amkette Tango FDD737BL Trubeats Tango Wired Headphone here.
  
Note: The links in this post are affiliate links.      
, , ,

Delete your Search History from Google and YouTube

How to delete your Search History from Google and YouTube - and reclaim your back.

Delete your Search History from Google and YouTube
I am not talking about your local records that are stored in your PC or laptop which you can clear easily.

Google maintains a record of every search you’ve ever made till date, if you have been logged in either Gmail or any other related Google services - in any browser - not just Chrome. And they’ll keep it forever unless you tell them to delete it.

Wait. My intention was not to scare you out, but to inform you that you have the option to remove all your records from Google and also tell Google not to store any thing in future!
 
This article will show you how to accomplish both of these, all in a few simple steps. Luckily, it is quite easy to delete your entire Google search history in one fell swoop. Here’s how: 

Step 1: Visit the history.google.com/history/ page on the Google website, and sign in if you are not yet already signed or are prompted to do so.


Delete your Search History from Google and YouTube
Click the Menu icon (it looks like 3 vertical dots in the top right).
Step 2: Click the Menu icon (those 3 vertical dots on the top right).

Delete your Search History from Google and YouTubeStep 3: Click Delete options.

Step 4: Select Advanced > All time from the drop-down menu.

Step 5: Click on Remove.

Step 6: Click Delete.


Step 7: And now to remove any chances of storing your search history go to settings and explore all the options under Manage Activity and Show More Settings

Step 8: Uncheck/Remove those options that are there for saving your history.

Delete your Search History from Google and YouTube


Step 9: You will also have the option to remove your YouTube activity and YouTube search history in there.


That’s all there is to it. Your Google search history has now been deleted.

Hope you enjoyed this article! As usual I value your comments and feedback! And if you find it useful please share in Facebook or Google plus to help others!


, , , , ,

Print from your Smart Phone or Tablet

How to Print from your Smart Phone or Tablet

Print from your Smart Phone or Tablet
All of us agree that smartphones and tablets have invaded our lives in a big way. Nowadays smartphones have become faster and equally efficient as laptops and PC and tablets are slowly replacing the PCs and Laptops in a world where form factor and speed is essential.

There are umpteen improvements in day-to-day work in the form of enhanced software and intelligent software that decides what you really need. However one thing that I found missing was the ability to print from a laptop or smartphone and it took some time for technology to catch up.

The usual way to connect to a printer is via a USB cable connection after installing the drivers and using software that came pre-installed on the device.
If it is not possible, or if you prefer to print wirelessly, you’ll probably need to download an app written just for that purpose. That is advancement for you!

Note: Some wireless printer manufacturers include an app for printing wirelessly from a mobile device on their printers’ installation CDs. If that is missing you can try to download the app available as a free download directly from the printer manufacturer's website (your printer’s user manual should give you the Website URL).

The big question is - what to do if your Printer is not Wireless enabled?

You are in luck! What you need is a PC with Google Chrome installed with your user account and an Android Phone (from where you need to print something) with a free app for your Android device.

This method involves a free service from Google called 'Cloud Print'. 

First, configure the PC that has a printer attached.


  1. In your Chrome Browser, sign in to your Google account (by clicking the menu button in the top-right corner).
  2. Go to Chrome Settings.
  3. At the bottom of the Settings page, click on 'Show advanced settings'.
  4. Scroll to the section labelled 'Google Cloud Print' and click the button 'Add printers'.
  5. A confirmation page will open. Click 'Add printer(s)'.
  6. A Cloud Print web page will open where you can configure many options in your printer settings.
  7. After you have installed a printer you can now use the 'manage printer' option that you will see here.

Next, set up the Android device that you want to print from.


  1. Download and install one of the free Cloud Print apps. I tried the newly released Google Cloud Print app such as CloudPrint Plus or CloudPrint
  2. Open the Cloud Print app and it should show the printer(s) that you set up on your PC.
You should now be able to print from any apps that allow sharing. Open a web page or document you want to print in any app, then click the Share button. Share the document to the Cloud Print app.

You’ll be able to send the file to the printer.  Because Cloud Print works over the Internet, you can use this feature to connect to a printer at your home or office or anywhere!

Note that you must be using the same Google account in Chrome and with the Cloud Print app after which your printer will be seen in the app. In case you did not know, the PC and/or the printer do not have to be switched on when you send the print command. The print job will be queued at Google Cloud Print until you turn the PC and printer on.

You can check what print jobs are waiting by clicking the Chrome “Manage printers” button mentioned above in step 7. If you do not want your printer to always be connected to the Internet, simply click the "Disconnect printers" button mentioned in step 8 above.

That is it! I hope you liked this nifty tip. Let me know if it worked for you or if you have a better suggestion. If this article helped you - please share it around socially!

, ,

Get the 64 bit version of the Chrome browser - it is fast.

Presenting the 64 bit version of the Chrome browser that saves your time.

Get the 64 bit version of the Chrome browser - it is fast.
Google released a 64 bit version of their popular Chrome web browser, and the current version is a lot faster and more stable than the 32 bit version (that we’ve all been using for so long by default)!


After using the 64 bit Chrome browser, I wanted to scream from the rooftops - this is one fast badass browser! 

There are many enhancements in the new version (such as a much crisper text on high-DPI monitors). 

But the best feature which I like the most is the increase in speed and stability as they are huge time savers in the long run. 

If your computer has a 64 bit OS, I strongly recommend installing the 64 bit version of Chrome ASAP. 

Rest assured that you will not lose any of your bookmarks or settings during the quick and silent upgrade process. 

Go to the download link at https://www.google.com/chrome/browser/


Get the 64 bit version of the Chrome browser - it is fast.


Simply click  on Download Chrome for another platform and follow the simple instructions.

Get the 64 bit version of the Chrome browser - it is fast.


Choose the Windows 8/7 64 bit version to download a setup file.

Note: If your computer has a 32 bit CPU you’ll not be able to install the 64 bit version.


, , ,

How to log in to multiple accounts in same website (with Google Chrome)

How to log in to multiple accounts in same website (with Google Chrome)
If someone had to ask me whether they could sign-in into a website with different identities to check out  multiple Yahoo email accounts at the same time, I would have advised them to use a different browser for each account or go incognito in separate instances of a browser (not in a tab)
But now I would ask you to use this plugin for Chrome browser - an excellent extension called Multi-Account Login that lets you easily log in to multiple online accounts on the same website by using just a single instance of your Chrome browser. 

It is the answer to dealing with multiple sign-in identities. 

Previously one would have to open different browsers to login into the same website but with different identities in order to protect single sign-on cookies from clashing. All that is a thing of the past now. 

Here’s how to install and use the Multi-Account Login extension:

How to log in to multiple accounts in same website (with Google Chrome)
First, install the extension - visit this page and click the 'Add to Chrome' button.

Secondly to log in to more than one account on any website - simply click the green 'New Account' icon, in the upper right-hand corner of the Chrome window (as seen in the screen shot window).

After you click on the icon, a new tab will open in which you can log into a different account. 

Doing this again will allow you to login the same website with different IDs. That is all.

This extension is completely free for personal use.


Let me know if you have other suggestions. I would love to hear them.
, ,

Simple guide to creating a self-hosted WordPress site (for Indians)

If you are interested in creating a self-hosted website read this simple guide to creating a self-hosted WordPress site (for Indians). There is no doubt that among the paid website software suite, WordPress is the most powerful blogging platform there is, and it’s completely free. It boasts of some of the robust and busiest websites on the Internet (you can check by the footer - 'powered by WordPress' - mentioned at the bottom of many a website), and though they are actually blogs (as WordPress is a blogging platform in a true sense), many of them appear far different than a typical “blog”.

It’s mighty easy to open a free account at WordPress.com and begin blogging in 5 minutes, but there nothing comparable to installing WordPress on your own paid hosting account with your preferred domain name. And it’s really easy to do!

Before we start, remember that you need to define your requirements like type of site (who it caters to), name of the site (remember to get it right as you cannot change it again) and the amount of money you are willing to spend. The last point is very important as you need to plan how much hosting space you need.

The first step is to head over to a good domain registrar cum hosting reseller and purchase a domain name (i.e. www.example.com) with site space for your WordPress blog. I am using Chennai-host for years, (but there are numerous registrars to choose from).

Why Chennai Host? They have all the options that you need in one single site. This is what you will see when you visit their site -


Just type in your required name in the box labelled 'DOMAIN NAME' and click on 'GO!'.

Make sure you're seeing the default option ticked - 'I want Chennai Host to register a new domain for me' - as seen in the screenshot below - 


On the next step you will be adding your domain purchase to the cart and also need to buy a hosting plan as seen in the screen shot below.


Remember to update the cart and checkout once you have filled in the required options such as the domain name and the hosting space. 

For hosting space plans I recommend getting the silver Linux hosting plan as it has good mix of price for functionality. Once you go professional and have plans for more than 2-3 blogs then you can go for the Gold Plus plans. But if you are a first time blogger then the Silver Linux hosting is good enough (atleast for a year to begin with). 

Regardless of the plan you pick, my instructions will work for you; only the mathematics will be different.


Keep in mind, you will be required to pay the annual rate in advance. That is how I found that a 3 year package works at 1200x3=3600/- which is cheaper than buying 1 year plans for 3 years separately. You can see that the savings are a cool 1000/-INR.

Once you have purchased a web hosting plan you’ll receive an email containing all the information you need in order to set up your WordPress blog. Two critical bits of information that will be sent in that email are the web addresses for the primary and secondary DNS servers that tell your visitors’ web browsers where to find your blog amongst the millions of other websites that inhabit the World Wide Web.

Now the next step would be to enter the cpanel page of your new site. Just add cpanel to the site name that you registered (for example if you registered www.,testmysite,.com then you need to use www. testmysite. com/cpanel to access your cpanel)
.
Once inside you have to follow the steps required to install WordPress by creating a user with all privileges and then running the WordPress installation program.

There is all that there is to get a WordPress site up and running (and in case you are having any further doubts, I will discuss how what to do after installing WordPress platform in a later post).

Learn More About WordPress

If you want to learn more about WordPress, I recommend you visit WP101.com. This is a tutorial website with lots of videos on every aspect of WordPress installation and maintenance.


Disclosure Note: The link above to ChennaiHost is an affiliate link - which means the company pays me a commission every time someone signs up via one of my links. But this does not influence my recommendation, because all hosting services have similar programs. I recommend ChennaiHost because I honestly believe they offer the best hosting available for Indians (and especially Chennaites) :) If you think there is a better host please mail me or message me in Facebook.


Stay tuned for more updates in this regard! Share if it helped you.


,

Blank bookmark favicons in Firefox

Hi Kish (aka CoolGeek)

I have a strange problem that has been plaguing me for years now. I find it strange that there are many Blank bookmark favicons in Firefox, that have no icons (favicons) beside them, in my bookmark toolbar. I thought it was a problem that would go away by itself and after so many years I find that it has been there like a permanent scar on my Firefox browser window. 

I cannot see the small icons for many bookmarks - some of them are even the highly popular ones like gmail.com. I am not sure if there is even a solution for this as I have a feeling that it is more user-related than browser-related bug.

So is there a way to get the lost or blank bookmark icons in Firefox, in my Firefox bookmark toolbar?
Thanks - Hemant Sareen.

Most bookmark icons (favicons) are blank in Firefox - CoolGeek answers:

Blank bookmark favicons in Firefox

Hi  Hemant. Your problem is not something that has no solution. In fact I too had this problem some time back and when I researched the case of the missing favicons I found that they got corrupted after Firefox 3 and later versions of Firefox due to some changes in the way they are stored and exported..

Many years ago after synchronizing my FF bookmarks on other laptops I lost all my favicons. The only way I could restore those favicons was to open each bookmark to reload the favicon. It was a good solution then but now that I have more than 1000 bookmarks... that wouldn't work for me. 

Fortunately I found something that works perfectly for me :)

Blank bookmark favicons in Firefox
Bookmark toolbar shows missing favicons.
Then there are also some plugins that are culprits like Ad muncher that prevent sites from changing favicons resulting in missing or blank favicons.

Another reason I found out was due to user negligence. 


Blank bookmark favicons in Firefox

Make sure that you do not run Firefox in permanent Private Browsing mode. Sometime you may tell Firefox to "never remember history" when you enter Private Browsing mode and select: Tools > Options > Privacy > History>Never Remember History" from the drop-down menu. See screenshot above.

Now that we discussed some possible reasons with regard to the missing icons let's see what we can do about it.

I have used this addon for Firefox that solves my and your problem immediately. 

Its aptly called  - 'FavIcon Reloader'. A small tool to reload/rebuild the Favorite icons.

How to install and use this addon:

Blank bookmark favicons in Firefox
Click on the Green Button that says 'Add to Firefox'
Visit this page in Firefox - Favicon Reloader and click on the green button that says Add to Firefox. See screenshot above.

Restart Firefox after you have given the OK to install this addon in the popup window.

Blank bookmark favicons in Firefox
After installation you will find the addon in the bookmark menu and in the context menu.

It finds those bookmarks that are without FavIcons and tries to fetch them from their web site.

Press the Play shaped button at the bottom of the addon window and wait for a few minutes (depending on how many bookmarks you have in your bookmarks folder).

It will start the process of downloading all the favicons for all your bookmarks and after its complete you can close the window.


I have tried that Addon and I must say that I am mighty pleased with it. This addon is exactly what I needed. I hope I have solved the case of the missing favicons!

 Feedback and comments are welcome! Share this article if you find it useful!