Showing posts with label Windows. Show all posts
, ,

How to block any website on Windows PC

How to block any website on Windows PC

The other day I received a mail from my reader Venugopal, asking me to help out with a peculiar problem - how to block a website on Windows PC so that no one could access it without his permission? You see he had saved all his passwords in his browser and someone in his family had used his PayPal credentials to pay up for a product in an online purchase. Seeing that it was done for a children's product he guessed that it was done by his teen kid who wanted to buy something which would have 'officially' not been approved. So he wants to know if the PayPal site can be blocked in that PC thereby avoiding a conflict.

Here is my reply to him:  Yes, Venu, fortunately there is a way to do it and it is very simple. And it has to do with adding a single line to a Windows file named Hosts.

Here’s how to do it:


  1. Log in to Windows using your Administrator account that has Administrator privileges. Usually the one you boot into Windows is an Administrator account by default. I'll tell you why this is important in point number 7 below.
  2. Open Windows Explorer and go to C:\Windows\System32\drivers\etc. then double-click the Hosts file. Select Notepad as the program to open it with.  
  3. Make a backup of the Hosts file before doing anything else (just in case anything goes wrong) by copying the contents of that file in a new notepad file and saving it in your regular place like 'My Documents' or 'Desktop'.
  4. Now in that Hosts file in notepad, go to the end of the very last line in the file, then press the Enter key to create a new line.
  5. Type 127.0.0.1 then press the space bar. Now type the URL of the website you wish to block (in this case www.PayPal.com). 
  6. Here, you could repeat steps 4 and 5 in order to block other websites in addition to www.PayPal.com. 
  7. Click File > Save as, then click the Save button to save the modified hosts file. Here if you are not an Administrator, you will not be able to save it as it is a system file.
  8. Restart your PC, then check to see if your can get to the www.PayPal.com website. If all steps were done correctly, you won’t be able to access it with any web browser.
Here’s a screenshot:


Note: This tip will work for Windows XP, Vista and Windows 8 as well. 

I suggest you might to consider placing a password on your Administrator account as otherwise anyone can simply undo the block from the Hosts file with a simple Google search. If you password protect your PC, no one will be able to alter the Hosts file to remove the line(s) you added.


, , ,

Delete your Search History from Google and YouTube

How to delete your Search History from Google and YouTube - and reclaim your back.

Delete your Search History from Google and YouTube
I am not talking about your local records that are stored in your PC or laptop which you can clear easily.

Google maintains a record of every search you’ve ever made till date, if you have been logged in either Gmail or any other related Google services - in any browser - not just Chrome. And they’ll keep it forever unless you tell them to delete it.

Wait. My intention was not to scare you out, but to inform you that you have the option to remove all your records from Google and also tell Google not to store any thing in future!
 
This article will show you how to accomplish both of these, all in a few simple steps. Luckily, it is quite easy to delete your entire Google search history in one fell swoop. Here’s how: 

Step 1: Visit the history.google.com/history/ page on the Google website, and sign in if you are not yet already signed or are prompted to do so.


Delete your Search History from Google and YouTube
Click the Menu icon (it looks like 3 vertical dots in the top right).
Step 2: Click the Menu icon (those 3 vertical dots on the top right).

Delete your Search History from Google and YouTubeStep 3: Click Delete options.

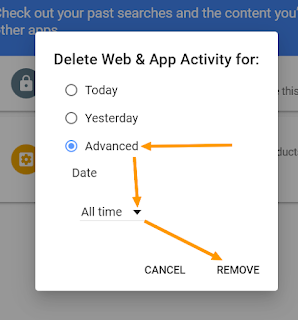
Step 4: Select Advanced > All time from the drop-down menu.

Step 5: Click on Remove.

Step 6: Click Delete.


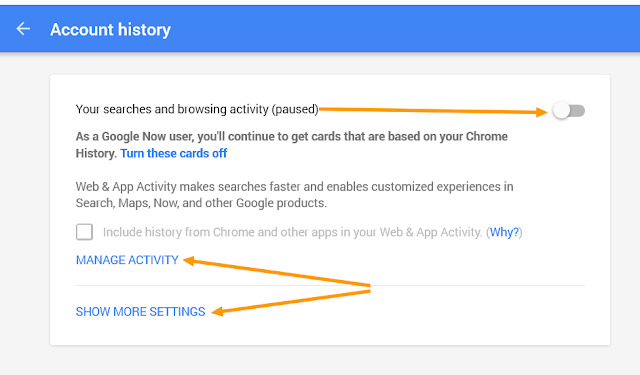
Step 7: And now to remove any chances of storing your search history go to settings and explore all the options under Manage Activity and Show More Settings

Step 8: Uncheck/Remove those options that are there for saving your history.

Delete your Search History from Google and YouTube


Step 9: You will also have the option to remove your YouTube activity and YouTube search history in there.


That’s all there is to it. Your Google search history has now been deleted.

Hope you enjoyed this article! As usual I value your comments and feedback! And if you find it useful please share in Facebook or Google plus to help others!


, , , , ,

Print from your Smart Phone or Tablet

How to Print from your Smart Phone or Tablet

Print from your Smart Phone or Tablet
All of us agree that smartphones and tablets have invaded our lives in a big way. Nowadays smartphones have become faster and equally efficient as laptops and PC and tablets are slowly replacing the PCs and Laptops in a world where form factor and speed is essential.

There are umpteen improvements in day-to-day work in the form of enhanced software and intelligent software that decides what you really need. However one thing that I found missing was the ability to print from a laptop or smartphone and it took some time for technology to catch up.

The usual way to connect to a printer is via a USB cable connection after installing the drivers and using software that came pre-installed on the device.
If it is not possible, or if you prefer to print wirelessly, you’ll probably need to download an app written just for that purpose. That is advancement for you!

Note: Some wireless printer manufacturers include an app for printing wirelessly from a mobile device on their printers’ installation CDs. If that is missing you can try to download the app available as a free download directly from the printer manufacturer's website (your printer’s user manual should give you the Website URL).

The big question is - what to do if your Printer is not Wireless enabled?

You are in luck! What you need is a PC with Google Chrome installed with your user account and an Android Phone (from where you need to print something) with a free app for your Android device.

This method involves a free service from Google called 'Cloud Print'. 

First, configure the PC that has a printer attached.


  1. In your Chrome Browser, sign in to your Google account (by clicking the menu button in the top-right corner).
  2. Go to Chrome Settings.
  3. At the bottom of the Settings page, click on 'Show advanced settings'.
  4. Scroll to the section labelled 'Google Cloud Print' and click the button 'Add printers'.
  5. A confirmation page will open. Click 'Add printer(s)'.
  6. A Cloud Print web page will open where you can configure many options in your printer settings.
  7. After you have installed a printer you can now use the 'manage printer' option that you will see here.

Next, set up the Android device that you want to print from.


  1. Download and install one of the free Cloud Print apps. I tried the newly released Google Cloud Print app such as CloudPrint Plus or CloudPrint
  2. Open the Cloud Print app and it should show the printer(s) that you set up on your PC.
You should now be able to print from any apps that allow sharing. Open a web page or document you want to print in any app, then click the Share button. Share the document to the Cloud Print app.

You’ll be able to send the file to the printer.  Because Cloud Print works over the Internet, you can use this feature to connect to a printer at your home or office or anywhere!

Note that you must be using the same Google account in Chrome and with the Cloud Print app after which your printer will be seen in the app. In case you did not know, the PC and/or the printer do not have to be switched on when you send the print command. The print job will be queued at Google Cloud Print until you turn the PC and printer on.

You can check what print jobs are waiting by clicking the Chrome “Manage printers” button mentioned above in step 7. If you do not want your printer to always be connected to the Internet, simply click the "Disconnect printers" button mentioned in step 8 above.

That is it! I hope you liked this nifty tip. Let me know if it worked for you or if you have a better suggestion. If this article helped you - please share it around socially!

, ,

Get the 64 bit version of the Chrome browser - it is fast.

Presenting the 64 bit version of the Chrome browser that saves your time.

Get the 64 bit version of the Chrome browser - it is fast.
Google released a 64 bit version of their popular Chrome web browser, and the current version is a lot faster and more stable than the 32 bit version (that we’ve all been using for so long by default)!


After using the 64 bit Chrome browser, I wanted to scream from the rooftops - this is one fast badass browser! 

There are many enhancements in the new version (such as a much crisper text on high-DPI monitors). 

But the best feature which I like the most is the increase in speed and stability as they are huge time savers in the long run. 

If your computer has a 64 bit OS, I strongly recommend installing the 64 bit version of Chrome ASAP. 

Rest assured that you will not lose any of your bookmarks or settings during the quick and silent upgrade process. 

Go to the download link at https://www.google.com/chrome/browser/


Get the 64 bit version of the Chrome browser - it is fast.


Simply click  on Download Chrome for another platform and follow the simple instructions.

Get the 64 bit version of the Chrome browser - it is fast.


Choose the Windows 8/7 64 bit version to download a setup file.

Note: If your computer has a 32 bit CPU you’ll not be able to install the 64 bit version.


, , ,

How to log in to multiple accounts in same website (with Google Chrome)

How to log in to multiple accounts in same website (with Google Chrome)
If someone had to ask me whether they could sign-in into a website with different identities to check out  multiple Yahoo email accounts at the same time, I would have advised them to use a different browser for each account or go incognito in separate instances of a browser (not in a tab)
But now I would ask you to use this plugin for Chrome browser - an excellent extension called Multi-Account Login that lets you easily log in to multiple online accounts on the same website by using just a single instance of your Chrome browser. 

It is the answer to dealing with multiple sign-in identities. 

Previously one would have to open different browsers to login into the same website but with different identities in order to protect single sign-on cookies from clashing. All that is a thing of the past now. 

Here’s how to install and use the Multi-Account Login extension:

How to log in to multiple accounts in same website (with Google Chrome)
First, install the extension - visit this page and click the 'Add to Chrome' button.

Secondly to log in to more than one account on any website - simply click the green 'New Account' icon, in the upper right-hand corner of the Chrome window (as seen in the screen shot window).

After you click on the icon, a new tab will open in which you can log into a different account. 

Doing this again will allow you to login the same website with different IDs. That is all.

This extension is completely free for personal use.


Let me know if you have other suggestions. I would love to hear them.
, ,

Microsoft Windows 10 will be released on July 29

Microsoft Windows 10 will be released on July 29.

The folks at Microsoft have just announced in a blog post that Windows 10 will be released to the general public on July 29. And it will be free during the first year!

Truth be told I was downright disappointed with Windows 8 and like everyone else on the PC planet I was wondering if I did the right thing in moving over from Windows 7.


Windows 8.1 seemed to resolve many of Windows 8’s quirks and issues, and after beta testing the “Preview” version of Windows 10 for quite some time I feel that, in my humble opinion, Windows 10 is the best version of Windows ever. Atleast something that made me happy personally. And I am sure you will be too.

If you desire to upgrade your Windows 7 or Windows 8/8.1 OS installation to Windows 10 (which I strongly recommend you to do), the upgrade process is quite simple to complete.

All you would need to do is install the “Windows Update” that will be released on July 29 to upgrade your OS to Windows 10.

If you like, you can tell Windows Update to install Windows 10 automatically by reserving your free copy of Windows 10 as of now. Just click the square little “Windows Icon” that would by now be displayed in your task bar. It should look something like this:


After you double-click the icon a box will box up asking if you wish to reserve your copy of Windows 10. To reserve your copy and instruct Windows Update to install it automatically upon its release, simply click the OK button.

For those of you who choose not to reserve your copy of Windows 10 and have Windows Update install it automatically, it will still be possible to update your PC to Windows 10 manually after its July 29 release.

Don't forget to check out Cortana, the world’s first truly personal digital assistant that helps you get many tasks done. Cortana learns your personal preferences, your mood swings and your requirements to provide relevant recommendations, fast access to information, and important reminders. Interaction is natural and easy via talking or typing. 

And the Cortana assistant works not just on your PC, but can notify and help you on your smartphone too if you have the windows mobile 10 OS on your cell phones. 

Oh... the mood swings part was just to get you excited btw... However it comes very close.


, ,

Buying an used SSD?

Buying an used SSD?

Buying an used SSD?

Can we buy an used SSD hard disk that is selling for a bargain? Think twice. While installing an SSD hard disk as the OS drive in your laptop is the best upgrade you can make in terms of the speed up and the saving of time, but in this case buying an used SSD is not a good idea.


There are several reasons why I will not suggest buying a used second-hand Solid State Drive:

1 – Limited Write count. SSDs can only be written to a limited number of times, and every write, uses up a portion of an SSD’s life unlike traditional spinning hard drives,. And since you can never know how many times a used drive has already been written to and what is its write count - before buying it -  you have no way of knowing how much life is still left in it

2- Dead cells count: Even though a used SSD might be working fine, it could contain non-working memory cells – a condition that tends to deteriorate once an SSD starts to fail in this aspect.

3 – New SSDs are affordable. While I accept that SSD’s are more expensive per Gigabyte of storage space than hard drives cost-wise, their prices have reduced greatly, of late. Decent sized SSDs are quite affordable these days and add the amount of time you would be saving!

4- Veracity - No one knows if the used SSD is second-hand or third-hand or even worse. After all the age of the SSD is not an indicator of its health. So better be safe than sorry.


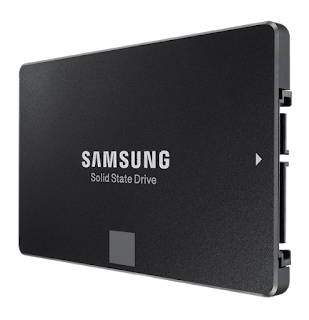
In fact, you can pick up an awesome Samsung 850 EVO 500GB 2.5-Inch SATA III Internal SSD for less than $200 on Amazon. The cost extra will certainly pay for itself in the long run.


Bottom-line: I feel that it is a much better deal buying a new one than paying for a used drive that might not last very long especially if it is the primary drive in your main laptop or computer.


Note: The links in this post are affiliate links. Amazon prices are subject to change.

, ,

How to disable access to the Control Panel in Windows 8

Dear Geek - Is there a way to disable access to the Control Panel in Windows 8? I ask this because I do not want my guest's kids tampering or fiddling with my computer's settings and I cannot give them guest user access since that would mean I would have to re-install some big software program all over again. Thanks in advance.

Nithish Rane, Aurangabad.
________________________________________________________________________


Dear Nithish - Yes. The answer to your question is positive and there is a way to do it. Just follow these steps and you are good to go.
  • Press the Windows+R key combination to open the “Run” box or click on the Run command in the start menu (if you have it enabled).
  • Type gpedit.msc in the Run box, and press the Enter key. This will open a Group Policy editor window.
  • Go to User Configuration>Administrative Templates>Control Panel.
  • Double-click on - Prohibit access to Control Panel and PC settings. A dialog box will open up on your screen.
  • Select Enabled, and click the OK button.
________________________________________________________________________

That is it. Whenever someone tries to access the Control panel they will get the message that access has been disabled.

Disable Control Panel
Whenever someone tries to access the Control panel they will get the message that access has been disabled.

, ,

Why you must calibrate the colors on your computer monitor

Why you must calibrate the colors on your computer monitor.

Do your photos look different on your computer monitor than they appeared on your camera’s LCD display or when they are seen in another computer/laptop? 

If so, its time to calibrate the colors on your monitor.And not only now but once in 4-6 months.


How to calibrate your monitor’s display?

Follow these steps if your PC is running Windows 7:

1 – Go to the Start button.

2 – Click Control Panel.

3 – Go to Hardware and sound.

4 – Click Display.

5 – Click Calibrate color and follow the instructions on the screens that follow.


Follow these steps if your PC is running Windows 8/8.1:

1 – Click on search panel of the Start Screen, then type 'calibrate'.

2 – Select 'Calibrate display color' from the list of search results.

3 – Follow the instructions on screen, that follow.

Calibrating your monitor every few months is a good idea. Electronic products tend to get affected by heat and therefore these settings need to be re-calibrated often.
, ,

Best place to get a replacement battery for laptops in India


Question from Nitin Jhaveri: Help me CG. I have some doubts regarding my laptop. Can we put the Laptop to sleep for long periods of time since my battery seems dead and where can we get good trustworthy battery replacement? Reason I ask is because I have trouble with my laptop, in which I can't have the Laptop without charging wire connected permanently as else it shuts off instantly on battery mode. So I finally decided to look into a new battery.


Hi Nitin, केम छो ?

Are you sure that its the battery and not the charging jack or wire that is faulty?? Try asking a friend to loan his adapter wire for a few minutes to see if the supply is going through. Another idea is to take it to the nearest Comp shop and have them checked with other adapters. Hope its not a big issue.

Most people I know using modern laptops use sleep as the most common method of leaving the laptop. For laptops I have had, I always let it sleep for short durations but for longer time periods it will be a drain on the battery so it is a definite no-no for me.

Technically from a fully-charged battery, sleep may last several days. However, it is not advisable due to the following reasons:
  • Wastage of battery charge reducing its efficiency.
  • Increasing the charge cycles so that also is a minus.
  • Heat generation.
  • Hard disk goes to off mode when battery gets completely drained raising chances of HDD bad sectors.
  • Waste of energy so not a good idea if you are bothered about the green aspect of saving energy.
Regarding your second question here is my answer.

There are many places to buy replacement laptop batteries, but my favorite is Amazon (US) (and the Indian Amazon would be the first place to go if you are from India due to faster Shipping).

Why Amazon ? There are several reasons:
  • Price – Amazon has consistently lower prices in almost everything. Why pay more to your laptop manufacturer when you can get the same battery or a high quality equivalent for a lot less on Amazon?
  • Stock variety – Amazon probably has a good selection of recent brands' replacement batteries to choose from.
  • Trust – Quality of Amazon products will matter a great deal if its something as critical as a Laptop.
  • Free Shipping – Amazon will generally waiver the shipping charges when the order total is $35 or more.
  • Easy Returns – If you happen to order the wrong battery or if it is defective, no worry. Amazon’s easy return policy makes it easy to return and get a replacement immediately. If the product is defective they will arrange to pick it up or may reimburse the courier cost.
However don't take my word for it. Read their return policies here to know more.

How to Order a replacement battery for your laptop from Amazon.  Here’s how:

  • Visit www.Amazon.com or Amazon.in and type your laptop’s brand and model number along with the keyword battery into the search box, then press Enter. For example, if you need a battery for a Dell Inspiron 15R N5010 you must type the following into the search box:
Dell Inspiron 15R N5010 battery
  • Browse through the list of replacement batteries presented and select the one you’d like to buy. 
A general rule of thumb is to look for a battery with good reviews + rating on Amazon.
That is all there is to be done.

 
I am wondering why I did not use Amazon for my earlier purchases.

If you have any similar questions don't hesitate to get in touch with me using my contact link.
If your problem is solved I may consider posting your query as an article!


Note: The links in this post are affiliate links.


, ,

Add a Start Menu to Windows 8 (or 8.1)

Windows start menu
Many of us were downright distraught when we saw the start button missing in the Windows 8 version. It looks like these MS guys toyed with us. They first made us addicted to the Start menu and then suddenly pull it from beneath our feet with the notion that it was a good idea to move on.

Not me.

I like to see what I want in my OS. So here is a handy li'l trick to bring back that button!

First, download Classic Shell (latest version of Classic Shell is 4.2.1) and install it from here. When a screen pops up asking which features to remove, select Classic Explorer and Classic IE9 since Windows 8 already had the latest versions.


After Classic Shell has been installed you’ll see your new “Start” button. The first time you click on it a configuration screen will pop up which will allow you to select a style to use.

Choose between 3 different styles: Classic, 2 Column and Windows 7.

I suggest choosing the style you are already most comfortable with, which for most people is probably Windows 7. After you’ve made your selection, Click “Yes” on the confirmation prompt and then “OK” to activate your selected style.

Also make sure that you fiddle around and see what are all the available options in Classic Shell
(see image on left).

You will love it!

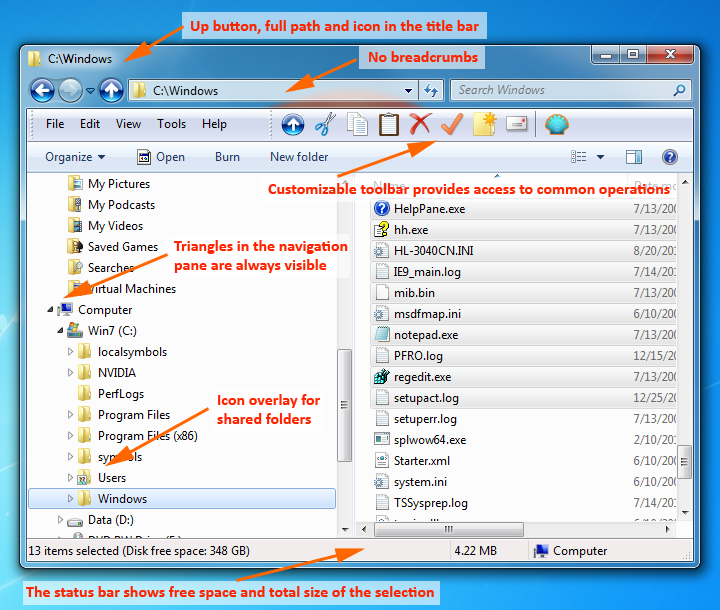
I liked the option to show the free disk space and the total file size in the status bar.


Another one that bowled me over is that this plugin brings back the simpler dialog box from Windows XP. In Windows 7 when you copy files and there is a conflict, you are presented with this:


Now you will see this instead:


This one (from XP style) is pleasant and better for the eyes ain't it?

So there you are folks! Have fun till I bring something interesting for you all, the next time!
, ,

How to open “My Computer” with the keyboard.

The desktop of almost all computers has a “My Computer” icon which opens up the file explorer window (aka windows explorer) when you click on it. This feature is one of the most used components of Windows which means that many of us click on it several times a day.

Here is a tip: There is a super-fast way to open “My Computer” without even touching the mouse! 

How to open My Computer using keyboard
Simply press the “Windows" key and the E key at the same time on the keyboard. The “Windows” key is typically located at the lower left corner of the keyboard below the alphabet "Z" (see diagram at right).

******************************

And what if the My computer icon is missing from the Desktop?

We have a solution for that too.
Here’s how: 

1 – Right-click on an empty area of the Desktop.
2 – Click Personalize.
3 – Click Change Desktop Icons.
4 – Check the box beside Computer in the menu window that pops up. You can choose to either display or hide any of the icons listed inside this window simply by checking or unchecking them.
5 – Click Ok.


, ,

Windows Tip: How to convert a Desktop or Laptop into a WI-FI Router

How to convert a Desktop or Laptop into a Router using the ICS options in Windows 7/ 8 /8.1


If you are like me, you will want to be online 24/7 and when there is an outage in your cable broadband WI-fi router then you will look for other alternatives like Smartphone Hotspot or tethering, right?
Wrong if you were careless like me.
What happened to me last week was downright irritating and frustrating to say the least.


Difficulty level: 3/5
Success level: 3/5


So in case you are in a scenario where (like me):

  • You are able to only access your internet via the LAN able.
  • You want to share your internet somehow but the darned WI-Fi router is fried or roasted.
  • Your connection seems to go ka-boom when its very urgent.
  • You wished you implemented something while there was a proper Internet connectivity.
  • Now that there is no connection you cannot even research into how to find a solution.
  • Your Mobile 3G or 4G pack just ended yesterday or you could have hotspot'ed it.
  • You wanted to access your neighbor's WI-fi but that too got encrypted last week (thanks to yourself).
 What would you do?

Its always better to be safe than sorry. OK... that was just plain silly to give you a piece of advice when I did not still offer you any thing tangible and was myself guilty of not having done it earlier. So without further ado let me get into the gritty-bitty of things.

First things first - you can convert your laptop or computer into a wireless router only if it has the latest WI-Fi card (or any latest WI-FI USB dongle) and a network card

If you have them, do as follows:

Part 1: Our first step is to Enable ICS (not Ice cream Sandwich but Internet Connection Sharing!). Not that you must know what the ICS stands for for it to work, but I just added it anyway so as to ruffle my geeky feathers :)

  • To enable ICS in Windows, go to the Control Panel and click on Network and Sharing Center. Make sure you are in icon view and not category view. Click on Change adapter settings in the left-hand menu.
  • Now right-click on Local Area Connection and choose Properties
  • Click on the Sharing tab and now you must tick/check: Allow other network users to connect through this computer’s Internet connection.
  • When you check the box, the dropdown box under Home networking connection will be enabled. 
  • Here you want to select the wireless network connection for your wireless card.
  • Important: If you have more than one network connection listed, it could be that one of them is a virtual adapter. Make sure to not choose that one. To make sure you can find out if it is a virtual adapter or not take a look look at all the adapters after clicking Change adapter settings at the beginning of this post. You will see that the Virtual adapters will have some number after it. Don't click on that one.
  • Click OK and close the Properties window. Now the LAN connection is shared and we need to go to the next steps.

Part 2: Steps to Create Ad-Hoc Wireless Network (after completing the above steps in part 1).


  • To create the ad-hoc wireless network that other computers will connect to, we need to go back to Network and Sharing Center and click on menu - Set up a new connection or network.
  • Now click on Setup a wireless ad hoc (computer-to-computer) network.
  • Click next and then give your network a nifty name. This name will be the SSID (your wireless broadcasting ID) for the network that other users will see on their computers. 
  • Imp: For Security type, choose None and leave the Security key box blank.
  • Check the Save this network box. Click Next and it will setup the new wireless network and tell you that it’s ready to use. Click Close and move on to Step 3.
  • The new network is seen in the list of WI-Fi signals in your to-be connected devices and the status is shown as "Waiting for users". This means the host computer is waiting for other users to connect. You can click on the network name and click Connect if the system didn’t connect automatically. 

That is it!
________________________________________________________________________________

EDIT: There is a small change that needs to be done in case you are using Internet Explorer.
Open IE and then click on the gear icon and choose Internet Options.
Click on the Connections tab and then click on LAN Settings.

Uncheck anything that is checked here (Automatically detect settings must be unchecked for sure).
________________________________________________________________________________

EDIT 2: In case there seems to be a problem browsing any site (but the ping command is working fine), use this procedure to reset WinSock. Open cmd-prompt as administrator* and run this command without the quotes:

netsh winsock reset
(type it exactly or better copy it) and hit enter in the cmd window. You will be asked to restart the computer. Do it and see if it works now.

________________________________________________________________________________


Hope this article helped you. In case it did please share the word around folks!
If you have any other tech questions to ask, just send me a mail using the 'contact me' form.
________________________________________________________________________________

*Highlight the Command Prompt result in the Windows search bar and press Control-Shift-Enter. Doing so will automatically launch Command Prompt with elevated administrative privileges
, , ,

Are Anti-virus programs necessary?

I keep getting asked this question whenever I meet friends. I know its a no-brainer for most of you but when it comes to the real world there are far more people out there who do not know a thing about computers other than having seen them in the offices.

The first question in this regard is:
"Are Anti-Virus Programs (AV) really needed when you have the  Microsoft's inbuilt Bit Defender?"

The next usual question is "Which one is the best?"

I have of late been assigned the job of an in-house tech guy to call for, whenever their PC goes kaput. Sadly I get no money out of it. Jus' jokin' fellas! What are family/friends for?

Coming to the question: 

My advice is that if you are a heavy internet user but not very savvy in the tech department you need to definitely get one. Period.

The two main culprits, in my opinion, are unsafe links (like in phishing e-mails) and spyware-infested downloads usually cracks or keygens. One click of mal-link can steer you to a site that, just by visiting installs malware on your PC. Also many software sites are filled with graphic ads that appear  as download buttons. You innocently click one, thinking you are downloading a particular program, but when you go to install it, boom: malware zone!


While Windows 8.1 does offer a robust security shield I have to say that today's threats are evolving like crazy. Your PC may be shielded from what comes from the wire or wireless internet (it may not even be used for accessing the internet).  

But what if the threat is local - like an USB stick that has been popped in a net cafe? Get what I mean? You may be allowing these critters in without your knowledge!


I am sure the cost of a decent AV will pay you more in the long run. Most importantly it will reduce the heartache of data loss. Money can replace all the hardware in the world but not the data. That too your priceless personal data.


Good AVs perform better than the free ones for sure. So if you do not have the idea to buy in the near future I suggest you to install the trial versions at the least. And if you do want to get one here is a list of the good ones (some that I have used over the years) with no mishaps whatsoever.

My personal favorite is without doubt - ESET.

Deals on ESET (60% OFF) - valid as on Apr - 10th 2015

And guess what - they are offering a whopping 60% discount for now. So rush in and grab your deal.

My personal choice for most of the home purposes would be the ESET Smart Security packages.


For single PC Eset Smart Security Version 8 - 1 PC, 1 Year (CD) (INR 399/- As on today)

For 2-3 PCs (including Laptops) Eset Smart Security - 2015 Edition (8) - 3 Pc / 1 Year  (INR 1190/-)


Tip: If you have 4-5 systems at home go ahead and get the 5 PC-1 year pack. It works cheaper.

Eset Business Security Pack - 5 PCs, 1 Year (DVD) (INR 3866/-) 


Note: The links in this post are affiliate links.